Ready to run your business on an open, enterprise-grade cloud system? Tech Alliance’s expert team has worked out all the kinks for the setup process to give you a complete MS Azure solution.
From initial preparation through 5 steps, we’ve outlined every detail to make the process easy and successful. Need more help? Reach out to us and we can work through the setup process together or do it for you.
5 Steps to Configuring Meraki VMX for Microsoft Azure
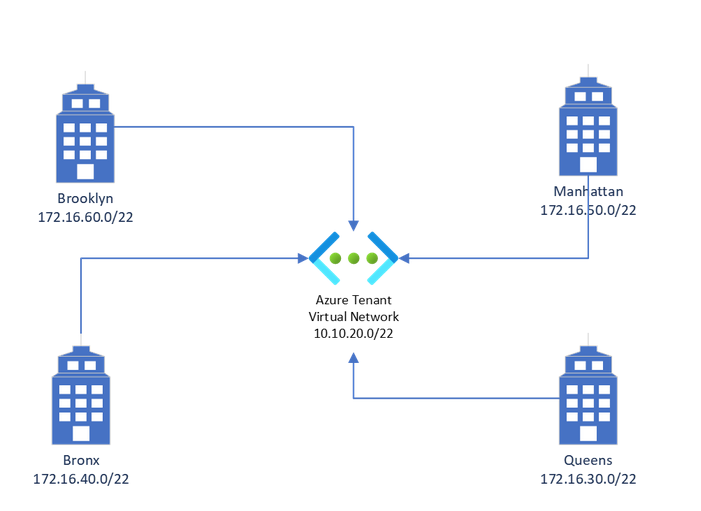
This article and guide applies to all versions of the Meraki VMX-L, VMX-M and VMX-S it does not apply to the older VMX-100 however many of the steps and troubleshooting tips are similar. For the purpose of this guide we will be using the following topology:
Initial Preparation
Login to your Meraki dashboard and create a new network called Azure or a name of your choice.
Step 1 — Licensing & Dashboard Configuration
You must either purchase or request a demo license for any version of the Meraki VMX virtual appliance, add and name the virtual device to your inventory, install the license into your Meraki dashboard and assign it to the network created in initial preparation. Confirm that the VMX virtual device is installed and that the license is assigned by viewing your inventory in the dashboard as shown below. It is important to confirm that this step is properly completed or the Azure configuration in the next section will fail.

Next you must generate an authentication token, from your Meraki Dashboard.
- Choose the network created in initial preparation
- Select Security & SD WAN
- Then appliance status
- At the bottom left, click generate authentication token, and copy and save the key.
You will need the key for the upcoming Azure configuration. The key is good for 1 hour. If the Azure setup cannot be completed within that time frame you will have to regenerate the key.
Step 2 — Azure Setup
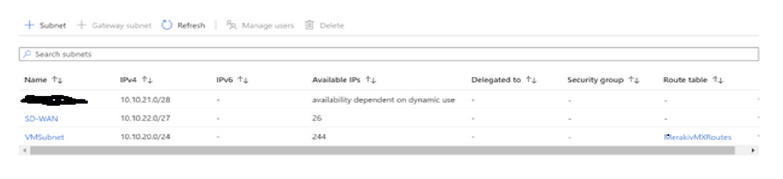
You will need an operational Azure tenant with at least 1 active subscription, and a Virtual network with enough address space to create a minimum of 2 subnets. Subnet 1 will be the Virtual machines and other Azure devices you want to link with the VPN tunnels, and subnet 2 you will create specifically to support the Meraki VMX virtual device.
In the example below, VMSubnet is the production Azure resources and SD-WAN will be used for the Meraki VMX. Do not deploy the Meraki VMX into the production subnet. Make sure you use the newly created dedicated SD-WAN subnet only.
Step 3 — Azure Provisioning
- Log in to your Azure tenant.
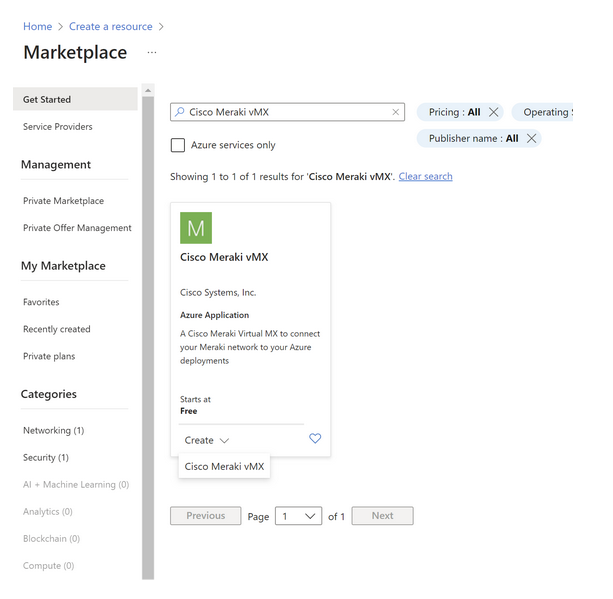
- Click create a resource.
- Search for Cisco Meraki MX.
- Create the resource.
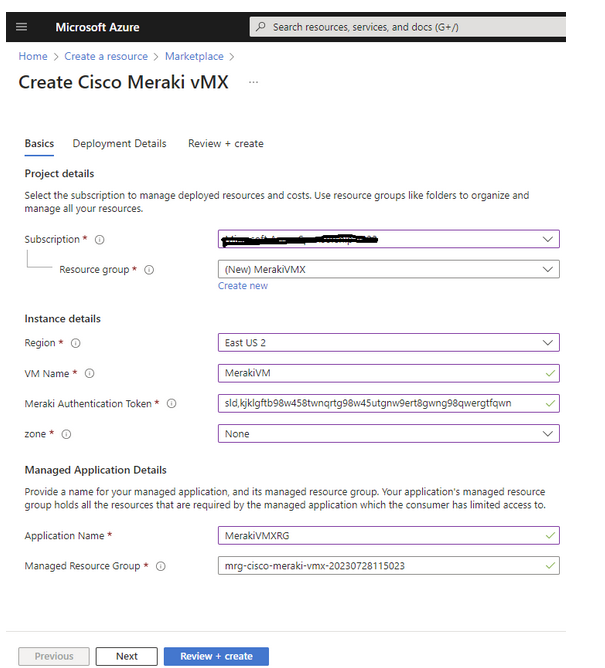
On the initial Meraki VMX setup screen, for subscription pick the subscription where your production resources are located:
- Create a new resource group.
- Name it.
- Pick your deployment region — The region and subscription must match the location of your Azure production resources. If you don’t see the resources in the dropdowns, check that the correct region and subscription are selected.
- Name the new Meraki VMX virtual machine.
- Paste the token from step 1.
- Choose zone none unless you need a highly available setup. If you don’t know what that is, stick with none as it’s the cheapest option and fine for most applications.
- Name the managed application, and leave the managed resource group alone.
- Click next.
For virtual network, select the production virtual network where all the Azure resources are. For subnet, pick the dedicated Meraki VMX subnet you created in step 2. For VM Size we have found that a D2_v3 size works perfectly fine for most applications and is half the monthly cost of the default F4s_v2. Select, review, and create to begin the Azure provisioning process.

This can take anywhere from 10 to 40 minutes to complete. If you get an error, see the troubleshooting section. If not proceed to step 4.
Step 4 – Meraki VMX configuration
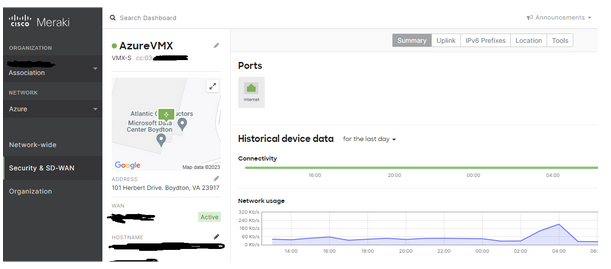
If the Azure provisioning is successful, you should see the VMX appliance on the Meraki dashboard turn green and display active.
- Select Security & SD Wan.
- For Addressing & VLAN, change the mode to passthru.
- Pick site to site VPN.
- Change Type to Hub.
- For local network, enter the address space network ID from the Azure virtual network screen.
- Save.
Step 5 – Create Azure route table
- Log in to your Azure tenant, click create a resource, search for route table and create a route table.
- Match the subscription, resource group and region to your Azure production resources (same as step 3).
- Name the table.
- Click review & create.
On the route table configuration screen, for subnet, enter the IP subnet ID corresponding to your Azure production network (same as step 2). Then pick routes. Add 1 route for each site-to-site VPN endpoint in your configuration as shown in the chart on page 1. Yours will be different. Address prefix is the IP network ID & mask of each remote site. The next hop type is virtual appliance. The following hop IP address is the IP address of your Meraki VMX appliance obtained from the Meraki dashboard. Click add.
Congratulations! You have set up the Meraki VMX appliance. The VPN status page on the Meraki dashboard should show all sites green and connected.
Need more help? Contact us to learn about our customized Cloud solutions for Azure.
See Our IT Outsourcing Services

Todd Stevens is a recognized Network Architect and founder of Tech Alliance. Todd holds degrees in Computer and Information Sciences, as well as many recognized technology industry certifications. Over the course of his career Todd has led numerous high-profile technology teams in the NYC area. Including: Rudin Management, Taj Hotels, Grove Press, NBC Universal, The Art Students League of NY, The Osborne Association and The Rockefeller organization.
You must be logged in to post a comment.